Guide 03 · Tactics
How to pick a route that is harder to cut
Rivals cut rails with the pulse tool, which reaches only 6 m along the ground, stops at the first wall or ledge and never hits another level. Rails in your start zone and within 1.6 m of the active receiver can’t be cut at all. So keep the exposed stretch in between short and awkward to shoot — along walls, on another level, away from the contested middle — and give it a backup branch, so one cut doesn’t stop your deliveries.
- can’t be cut
- exposed stretch
- rival’s reach
01 / Already safe
Where a rail can’t be cut
- r 4.5 m
Your start zone
Your own rail whose middle lies inside your start zone — the circle in your team colour around your base, 4.5 m in radius — can’t be broken. Rivals can’t hit you there either.
- 1.6 m
Right at the active receiver
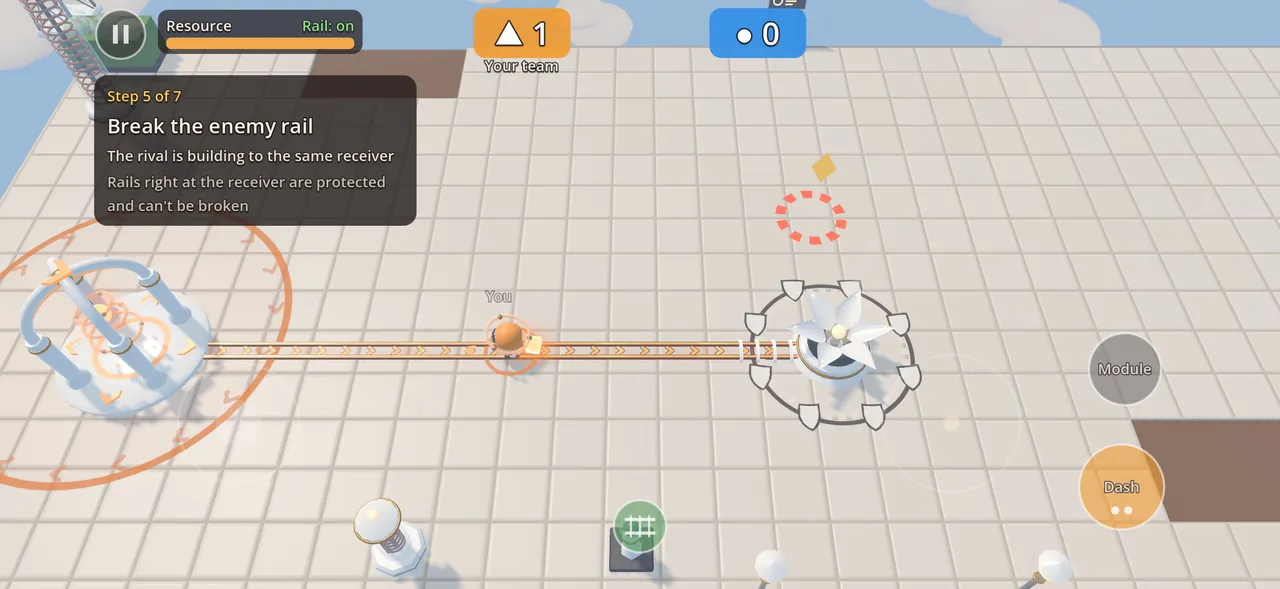
Rails of both teams whose middle is within 1.6 m of the active receiver can’t be broken. Look for the ring of shields around the receiver and the white collars on protected rails. The ring moves with the active receiver every round. Instead of a cut, the shooter sees the message Rails at the receiver are protected.
- 3 s
Under your Insulator
The Insulator module shields one piece of your rail for 3 s (cooldown 12 s, aim up to 6 m). It never wastes itself on rail that is already safe — inside the guard ring or your own start zone.
02 / The threat
How far a cut reaches
The wave of a shot stops at its first hit, so one shot breaks at most one piece. Then the tool reloads for 1.2 s.
cut: In reach
Exposed rail closer than 6 m breaks.
safe: Behind a wall
The wave stops at the first wall or ledge.
safe: On another level
The wave never changes level: a rail up on a deck is out of reach.
safe: Beyond 6 m
The wave goes no further.
03 / The choice
Choose the route
Shorten the exposed stretch, not just the route
What matters is the part outside both safe zones. A slightly longer route that spends less time in the open is often the better one.
Hug walls and edges
A wave stops at the first wall. Rail laid along a wall can’t be reached from its far side, so there are fewer places to shoot from.
Use another level
Where an arena has raised decks, rail up there is out of reach from the ground; decks are entered by their ramps.
Stay out of the crowd
The middle of the arena is where both teams meet. A side route meets fewer shooters — at the price of a few extra metres.
On each arena
Coil Garden
An open arena: central receiver, two flank routes and a bridge.
In round 1 the bridge shortens the route to the central receiver from 27.6 m to 22.5 m — while someone keeps it powered. The two flank routes are always there.
Weaving Yard
Levels and ramps: routes cross over each other without connecting.
No bridges here. Rail on the raised decks can’t be hit from the ground; the raised routes are anywhere from slightly to much longer than the direct ground-level route.
Cloud Wharf
Two bridges and an always-open safe route.
Round 1 opens with a choice: about 29.5 m over a bridge, or 33.8 m along the always-open safe route — longer, but there is no bridge to lose.
04 / Redundancy
Build a backup
The pulse always takes the shortest powered path and can switch to another one at a junction when the way ahead is cut. So a second branch keeps deliveries flowing while the first is being repaired. The loading-screen tip puts it simply: A backup route keeps deliveries flowing when the main one is cut.
- A backup doesn’t raise the rate: still one pulse every 3 s.
- A backup uses resource (1 per metre) and counts towards your 80 m cap — share the job: one courier holds the main route, another lays the backup.
- Fork early — ideally inside your start zone — so the whole exposed stretch is doubled. A fork just before the receiver leaves the shared part in front of it as a single weak spot.
- Practise it in the challenge “Backup route”:
Deliver 3 pulses while a bot keeps cutting your main rail.
05 / Damage control
When it gets cut anyway
- 1 s
Re-lay after the sparks
The gap is locked while it sparks. The challenge “Repair” has the routine:
Wait for the sparking gap to settle, then ride over it.
- 4 m
Patch it with the Jumper
The Jumper restores a stretch of up to 4 m cut within the last 6 s, for 4 s (reach 8 m, cooldown 12 s). It works after the sparks settle and costs 1 per metre. Ride over the patch with laying on to make it permanent.
- 12 s
Save the energy
A pulse on the cut stretch drops as a spark. Grab it before a rival does and stay in the receiver ring for 0.4 s — it’s still your point if you deliver it.
VELTRAIL 1.0.0 · build 1
Where the numbers come from
Every number on this page is read from the data files of VELTRAIL 1.0 (build 1). When an update changes the balance, the page changes with it.
Last compared with the game’s files:
Show the table (22)
| What | Value | Source |
|---|---|---|
| Pulse tool reach | 6 m | Game balance databalance.json · tool.range |
| Pulse tool reload | 1.2 s | Game balance databalance.json · tool.cooldown_s |
| Protected zone around the active receiver | 1.6 m | Game balance databalance.json · rule_options.receiver_guard_m |
| Start zone radius | 4.5 m | Arena layouts (the same on all three arenas)arenas/*.json · base_zones.<team>.radius |
| Insulator: shield time | 3 s | Module datamodules.json · modules[id=insulator].duration_s |
| Insulator: cooldown | 12 s | Module datamodules.json · modules[id=insulator].cooldown_s |
| Insulator: reach | 6 m | Module datamodules.json · modules[id=insulator].range |
| New rail, per metre | 1 per metre | Game balance databalance.json · rail.cost_new_per_m |
| Pulse speed | 8 m/s | Game balance databalance.json · pulse.speed |
| Generator beat (one pulse per…) | 3 s | Game balance databalance.json · pulse.emission_period_s |
| Active rail per player | 80 m | Game balance databalance.json · rail.player_cap_m |
| Bridge closing warning | 3 s | Game balance databalance.json · bridge.closing_warn_s |
| Sparking gap after a cut | 1 s | Game balance databalance.json · rail.break_lock_s |
| Jumper: longest stretch | 4 m | Module datamodules.json · modules[id=jumper].max_length |
| Jumper: works on cuts younger than | 6 s | Module datamodules.json · modules[id=jumper].recent_window_s |
| Jumper: repair lasts | 4 s | Module datamodules.json · modules[id=jumper].duration_s |
| Jumper: reach | 8 m | Module datamodules.json · modules[id=jumper].range |
| Jumper: cooldown | 12 s | Module datamodules.json · modules[id=jumper].cooldown_s |
| Spark, total life | 12 s | Game balance databalance.json · spark.total_life_s |
| Hand delivery: time inside the receiver ring | 0.4 s | Game balance databalance.json · spark.delivery_hold_s |
| Coil Garden, round 1: bridge open / the way round | 22.52 / 27.56 m | Measured with the game’s own arena tool on the version 1.0 arena layouts |
| Cloud Wharf, round 1: bridge open / the way round | 29.54 / 33.79 m | Measured with the game’s own arena tool on the version 1.0 arena layouts |